
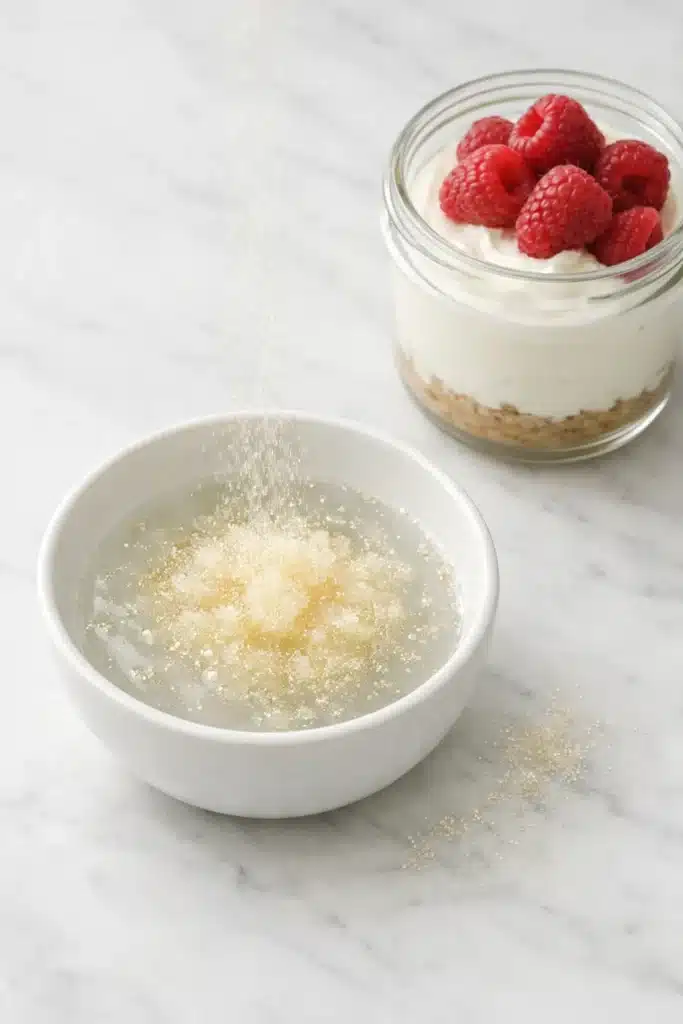
Gelatin cheesecake gluten free is not a complicated concept. It is half a teaspoon of unflavored gelatin, bloomed in cold water, dissolved in the microwave, and stirred into your Greek yogurt before assembling the viral Japanese cheesecake hack. That is the entire upgrade.
But that single half teaspoon is the difference between a gluten free cheesecake that sets firmly and holds for three days in the fridge, and one that stays liquid no matter how long you wait. The gelatin cheesecake gluten free technique is what makes the no-bake version actually work — consistently, reliably, every single time.
In this guide I will explain exactly why gelatin is essential in a gluten free cheesecake, how to use it correctly, how much to use for different yogurt types, and what goes wrong when people skip or rush the process. By the end, the gelatin cheesecake gluten free technique will be second nature.
| ⚡ Gelatin Cheesecake Gluten Free — Quick Summary Amount: ½ tsp unflavored gelatin per serving (¾ tsp for dairy-free yogurt) Method: bloom in cold water 5 minutes → microwave 8-10 seconds → stir into yogurt immediately Why it works: gelatin forms a 3D protein network that firms the yogurt layer Result: set cheesecake in 4 hours, holds perfectly through day 3 |
Table of Contents
Table of Contents
Why Gelatin Cheesecake Gluten Free Works — The Science in Plain English
To understand why the gelatin cheesecake gluten free technique works, you need to understand why the original viral hack — made with Biscoff cookies and regular wheat-based starch — sets so well without any gelatin.
Biscoff cookies contain damaged wheat starch that slowly releases into the yogurt as the cookies soften. This starch interacts with the yogurt’s casein protein network and helps the yogurt firm up slightly as it chills. The result is a yogurt layer that thickens naturally around the softening cookies.
Gluten free cookies — even the best ones like Simple Mills Sweet Thins — do not contain the same wheat starch. Their starch profile is different. The natural thickening effect is weaker or missing entirely. The yogurt layer in a gluten free cheesecake stays looser than in the original recipe, and it can weep liquid whey after a few hours.
This is where adding gelatin to gluten free cheesecake makes the critical difference. Gelatin is a protein derived from collagen that forms a three-dimensional network when dissolved in liquid and cooled. At half a teaspoon per cup of yogurt — the network is soft and creamy, not jiggly. It reinforces the yogurt’s own casein structure, traps the whey so it cannot separate, and gives the whole layer the firm, sliceable set that the original Biscoff version achieves through wheat starch.
Used at the right concentration, the gelatin does not make the cheesecake taste like gelatin or Jell-O. It simply makes the yogurt behave the way it should — thick, stable, and genuinely cheesecake-like.

How Much Gelatin to Use in Gluten Free Cheesecake — The Dosage Guide
The correct amount of gelatin for a gelatin cheesecake gluten free varies depending on the type of yogurt you are using. Full-fat Greek yogurt already has significant protein structure from its casein content, so it needs less gelatin than dairy-free alternatives.
Here is the gelatin cheesecake gluten free dosage table I developed after testing six different yogurt types:
| Yogurt Type | Gelatin Amount | Chill Time | Result |
| Full-fat Greek yogurt (5%+) | ½ tsp per serving | 4–6 hours | Firm, creamy, sliceable |
| Skyr (Icelandic yogurt) | ½ tsp per serving | 4–6 hours | Firmest result — best for unmolding |
| 2% Greek yogurt | ½–¾ tsp per serving | 5–7 hours | Good but slightly looser |
| Thick coconut yogurt | ¾ tsp per serving | 6–8 hours | Good with overnight preferred |
| Almond milk yogurt | 1 tsp per serving | Overnight | Works but less creamy |
| Low-fat Greek yogurt | ¾ tsp per serving | Overnight | Acceptable — strain first |
These amounts apply per 1 cup (240ml) of yogurt. Scale proportionally for larger batches — 4 cups of yogurt needs 2 tsp gelatin. Using the wrong amount is also one of the main reasons cheesecake won’t set in the GF version.
How to Bloom Gelatin for Gluten Free Cheesecake — The Full Technique
The blooming technique is the most important step in the gelatin cheesecake gluten free process. More failures come from incorrect blooming than from any other mistake — including using the wrong yogurt. Here is exactly how to do it right.
Step 1 — Measure cold water first
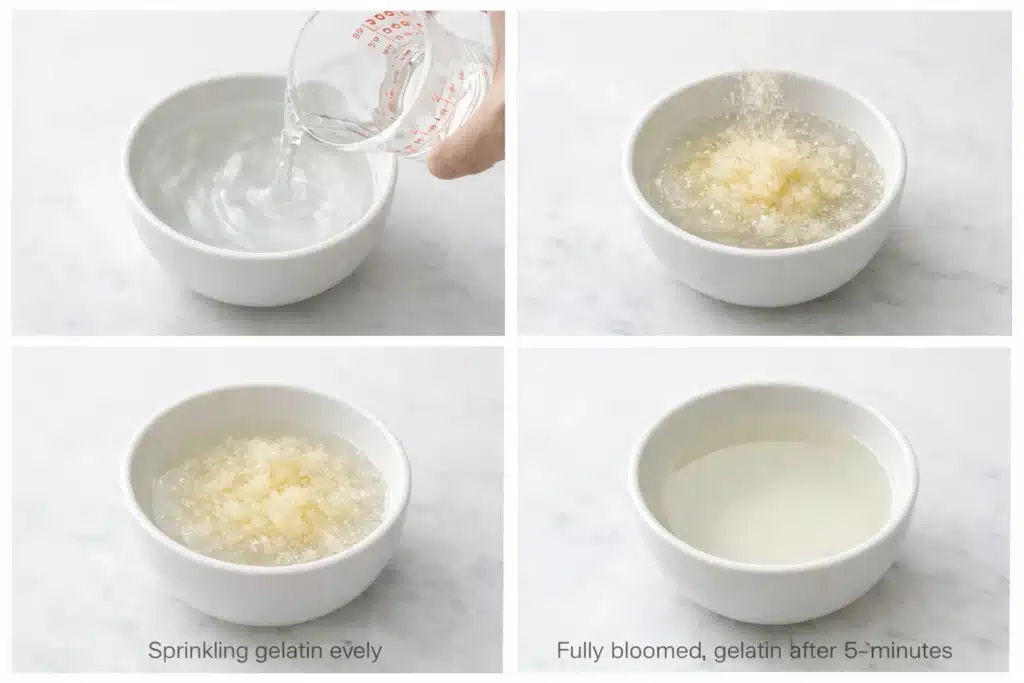
Add exactly 1 tablespoon of cold water to a small bowl or ramekin. The water must be cold — not lukewarm, not room temperature. Cold water allows the gelatin granules to hydrate slowly and evenly. Warm water causes the outside of the granule to swell and seal before the inside hydrates, creating lumps in your gelatin cheesecake gluten free.
Step 2 — Sprinkle, do not dump
Sprinkle the measured gelatin powder evenly across the surface of the cold water. Do not dump it in a pile. A pile of gelatin creates a clump where the outer layer seals and the center stays dry — those dry granules will never dissolve properly and will create gritty texture in your gelatin cheesecake gluten free.
Step 3 — Wait the full 5 minutes
Let the gelatin sit undisturbed for exactly 5 minutes. You will see it transform from loose powder into a firm, spongy, almost rubbery mass that absorbs all the water. This is fully bloomed gelatin. Do not rush this step. A 2-minute bloom leaves partially hydrated granules that create lumps and uneven texture in the final gelatin cheesecake gluten free.
Step 4 — Dissolve in the microwave
Microwave the bloomed gelatin for exactly 8–10 seconds. It will melt into a clear, slightly warm liquid. Stir once with a small spoon to confirm there are no granules remaining. The liquid should be completely transparent. If you see any cloudiness or granules, microwave for 3 more seconds and stir again. Do not let it boil — boiling destroys the protein structure and your gelatin cheesecake gluten free will not set.
Step 5 — Add to yogurt immediately
Pour the liquid gelatin into your prepared yogurt in a thin stream while stirring constantly. Work quickly — liquid gelatin starts to gel at around 59°F and you have approximately 5 minutes of working time at room temperature before it begins to set in the bowl. Have your jars ready before you start this step. This is the most time-sensitive moment in the gelatin cheesecake gluten free process.
| ⚠️ Common Blooming Mistakes in Gelatin Cheesecake Gluten Free Dumping gelatin in a pile: creates lumps that never dissolve → gritty texture Rushing the bloom (under 5 min): partially hydrated granules → streaky set Overheating in microwave (boiling): destroys gelling protein → won’t set at all Waiting too long after dissolving: gelatin starts to set in bowl → streaks in yogurt Adding to cold yogurt straight from fridge: gelatin sets too fast on contact → lumps |
Gelatin Cheesecake Gluten Free Dosage Adjustments — When to Use More or Less
The standard half teaspoon of gelatin per serving works perfectly for a gelatin cheesecake gluten free made with full-fat Greek yogurt. But several factors can require you to adjust the amount up or down.
Increase gelatin to ¾ tsp when:
- Using dairy-free yogurt — coconut, almond, or oat yogurts have less natural protein structure
- Using 2% or low-fat Greek yogurt — more water content needs extra structural support
- Making the cheesecake in warm weather (above 75°F ambient) — gelatin sets more slowly
- Using flavored yogurt — some brands add starch thickeners that interfere with gelatin network formation
- You want to unmold the gelatin cheesecake gluten free onto a plate for presentation
Keep at ½ tsp when:
- Using full-fat Greek yogurt (5%+) like Fage Total 5% or Siggi’s 4%
- Using skyr — skyr has the highest protein content and needs the least gelatin
- Chilling overnight — longer chill time compensates for lower gelatin concentration
- You prefer a softer, more mousse-like gelatin cheesecake gluten free texture
Reduce to ¼ tsp when:
- You want an extremely soft, barely-set texture — more like thick yogurt than cheesecake
- Using skyr with overnight chilling — the extra protein means less gelatin needed
Which Gelatin to Use for Gluten Free Cheesecake
For the gelatin cheesecake gluten free technique, use unflavored gelatin powder. Flavored gelatin products like Jell-O contain sugar, food coloring, and artificial flavors that will change the taste of your cheesecake in ways you do not want.
Knox unflavored gelatin is the most reliable option in the US, with a consistent bloom strength (225 bloom). Generic store brands can have inconsistent bloom strength — if your gelatin cheesecake gluten free works with Knox but fails with a generic brand, this inconsistency is almost always the cause.
Gelatin sheet vs powder for gluten free cheesecake
Sheet gelatin (leaf gelatin) can be used instead of powder at an equivalent rate. One standard gelatin sheet equals approximately ¼ tsp of powdered gelatin. For a standard gelatin cheesecake gluten free serving, use 2 sheets. Soak the sheets in cold water for 5 minutes (they will become soft and floppy), squeeze out the excess water, then dissolve them in warm (not boiling) water before adding to the yogurt.
Vegan alternative: agar agar
For a fully vegan version, substitute agar agar at the same quantity. Agar sets firmer, sets faster, and does not re-melt at room temperature. The texture is slightly more firm-jelly than creamy-cheesecake. Dissolve agar in warm yogurt and work very quickly — it begins gelling almost immediately on contact with cooler temperatures.
For the full dairy-free cheesecake gluten free guide including agar instructions, see our dedicated article.”
The Complete Gelatin Cheesecake Gluten Free Recipe
Prep: 10 min | Chill: 4–8 hours | Servings: 2 | Difficulty: Easy
Ingredients
- 2 cups (480g) full-fat plain Greek yogurt — 5% fat minimum
- ½ tsp unflavored gelatin powder (Knox recommended)
- 1 tbsp cold water
- 1 tsp pure vanilla extract
- 2 tbsp honey or maple syrup
- Pinch of fine sea salt
- 1 tsp fresh lemon juice
- 12–16 Simple Mills Sweet Thins or Schar Biscotti (certified GF)
- Toppings: fresh raspberries, strawberry jam, or lemon curd
Instructions
- Sprinkle ½ tsp gelatin evenly over 1 tbsp cold water in a small bowl. Do not stir. Let sit undisturbed for 5 minutes until fully bloomed and spongy.
- Microwave bloomed gelatin for 8–10 seconds until completely liquid and clear. Stir once. Do not let it boil.
- In a medium bowl, mix Greek yogurt with vanilla, honey, salt, and lemon juice. Taste — it should taste like lightly sweet cheesecake filling.
- Pour the warm dissolved gelatin into the yogurt in a thin stream while stirring constantly. Mix thoroughly for 30 seconds.
- Immediately divide the yogurt between two 8oz glass jars, filling each about ¾ full.
- Press 6–8 GF cookies vertically into each jar, pushing them halfway into the yogurt.
- Cover and refrigerate for a minimum of 4 hours. Overnight gives the richest gelatin cheesecake gluten free result.
- Add toppings just before serving. Never before refrigerating.

Gelatin Cheesecake Gluten Free Troubleshooting
My gelatin cheesecake gluten free has lumps in the yogurt
Lumps mean the gelatin was not fully dissolved before adding, or it was added to yogurt that was too cold. Remove yogurt from fridge 10 minutes before assembling, confirm the dissolved gelatin is fully clear, and stir vigorously for 30 seconds after adding.
My gelatin cheesecake gluten free is still liquid after 6 hours
Three possible causes: (1) the gelatin was boiled and the gelling protein destroyed — start over with new gelatin, (2) you used too little gelatin for your yogurt type — refer to the dosage table above, (3) the fridge is above 40°F — use a thermometer to verify. A gelatin cheesecake gluten free sets in the fridge but not at room temperature.
My gelatin cheesecake gluten free tastes slightly rubbery
You used too much gelatin. At ½ tsp per serving the texture should be imperceptible. At 1 tsp+ per serving the gelatin flavor and texture become noticeable. Reduce to ½ tsp and the rubbery quality will disappear in your next gelatin cheesecake gluten free.
My gelatin cheesecake gluten free is grainy
Undissolved gelatin granules. The bloom was rushed or gelatin was not fully dissolved. Always confirm completely clear liquid before using. If this happens repeatedly, switch to Knox for the most consistent granule size.
Frequently Asked Questions
Is gelatin itself gluten free?
Yes — plain unflavored gelatin is naturally gluten free, derived from animal collagen with no gluten ingredients. Knox unflavored gelatin is certified GF and safe for Celiac disease. Always check labels — flavored products like Jell-O may contain additives. For gelatin cheesecake gluten free, use plain unflavored only.
Can I make gelatin cheesecake gluten free without the cookies?
Yes — increase gelatin to ¾ tsp per serving, skip the cookies, pour into jars or ramekins, and chill overnight. The result is closer to a panna cotta but delicious. A gelatin cheesecake gluten free without cookies makes a great simple dessert on its own.
How far in advance can I make gelatin cheesecake gluten free?
Up to 3 days in advance, covered in the fridge. The result actually improves through day 2 as the flavors meld and the cookies reach ideal softness. Day 3 is still excellent — the texture becomes more mousse-like but remains fully set. A gelatin cheesecake gluten free holds better than any no-gelatin version at this point.
Can I use gelatin sheets instead of powder for gluten free cheesecake?
Yes. Use 2 standard gelatin sheets per serving instead of ½ tsp powder. Soak in cold water for 5 minutes until soft, squeeze out excess water, dissolve in 2 tbsp warm water, then add to yogurt. The result is identical to the powder version.
Does gelatin cheesecake gluten free work with flavored yogurt?
Yes, but some flavored yogurts contain starch thickeners that interfere with gelatin network formation. If your gelatin cheesecake gluten free is setting unevenly, switch to plain full-fat yogurt and add your own vanilla and sweetener. Plain yogurt with ½ tsp gelatin consistently outperforms pre-flavored yogurt.
What is the difference between gelatin and agar agar in gluten free cheesecake?
Both are gelling agents but they behave very differently. Gelatin creates a soft, creamy, melt-in-the-mouth texture. Agar creates a firmer texture that does not melt at room temperature. For a gelatin cheesecake gluten free that tastes like real cheesecake, gelatin is always the better choice. Agar works as a vegan substitute but the texture is noticeably different.
Final Thoughts: Gelatin Cheesecake Gluten Free Is the Upgrade This Hack Needed
The gelatin cheesecake gluten free technique is not complicated. Half a teaspoon of unflavored gelatin, properly bloomed, correctly dissolved, and stirred into full-fat Greek yogurt before assembling. That single addition transforms an inconsistent hack into a reliable, professionally-textured dessert that sets firmly, holds for days, and tastes genuinely like cheesecake.
Once you have this technique dialed in — and after reading this guide you do — you will never go back to making the hack without gelatin. The difference in texture, stability, and consistency is not subtle. A gelatin cheesecake gluten free impresses. The version without it disappoints.

Gelatin Cheesecake Gluten Free (No-Bake Yogurt Hack)
Ingredients
Equipment
Method
- Step 1 — Bloom the gelatin
- Sprinkle ½ tsp gelatin evenly over 1 tbsp cold water. Do not stir or dump in a pile. Let sit undisturbed for exactly 5 minutes until fully spongy and bloomed.
- Step 2 — Dissolve the gelatin
- Microwave bloomed gelatin for 8–10 seconds until completely liquid and clear. Stir once with a small spoon. No granules should remain. Do not let it boil — boiling destroys the gelling protein.
- Step 3 — Make the yogurt base
- Mix Greek yogurt with vanilla, honey, salt, and lemon juice in a medium bowl. Taste — it should taste like lightly sweet, tangy cheesecake filling. Adjust sweetness if needed.
- Step 4 — Add gelatin to yogurt
- Pour dissolved gelatin into the yogurt in a thin, steady stream while stirring constantly. Mix vigorously for 30 seconds until fully incorporated. Work quickly — you have 5 minutes before gelatin starts to set at room temperature.
- Step 5 — Fill the jars
- Immediately divide the yogurt mixture between two 8oz glass jars, filling each about ¾ full. Have the jars ready before Step 4.
- Step 6 — Insert the cookies
- Press 6–8 GF cookies vertically into each jar, pushing them halfway into the yogurt. Leave a small gap between each cookie for maximum contact with the yogurt.
- Step 7 — Refrigerate
- Cover and refrigerate for a minimum of 4 hours. Simple Mills Sweet Thins = best at 4–6 hours. Schar Biscotti = overnight (10–12 hours) for the most authentic cheesecake crust texture.
- Step 8 — Top and serve
- Add toppings just before serving — never before refrigerating. Spoon jam in the center, add raspberries, drizzle honey. Serve cold straight from the fridge.